Water Level Information
The WaterRower comes shipped complete with a syphon pump for ease of filling or emptying the tank.
To fill the tank or add water; simply place a container of water onto the top of the machine, insert the stiff tube of the syphon pump into the container of water and the flexible tube through the hole in the WaterRower tanks, pump couple of primes by hand and let gravity do all the work.
To empty the tank or remove water; simply place an empty container by the side of the machine, insert the stiff tube of the syphon pump into the WaterRower tank and the flexible tube into a container or outside, pump a couple of primes and again gravity does all the work.
Recommended Levels
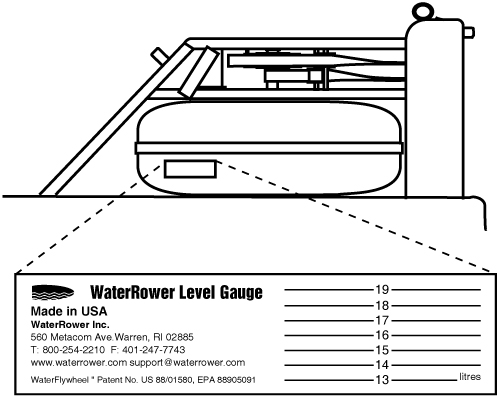
The amount of water in the tank simulates the weight of the boat and crew, the more water in the tank the heavier the boat and crew. The standard Calibration Level is Level 17. If the user is lighter in weight, Level 15-16 can be used. If the user is heavier in weight, level 18-19 can be used. The maximum level to fill the tank is Level 19. DO NOT fill above the maximum level – this could void the warranty.
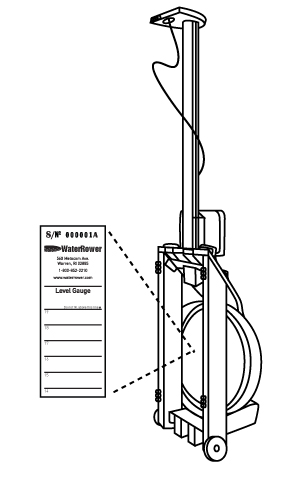
When filling up your tank with water, refer to the Level Gauge sticker positioned on the side of the tank for S4 model rowers (bottom image) and under the tank for A1 model WaterRowers (right image). Information on the sticker includes WaterRower contact information.
S4 Model Rower

A1 Rower

Step 1. Adjusting the Floating Heel Rests for Push Button Footboard
You should adjust the floating heel rests to a height suitable for your foot size.
On the WaterRower Push Button Footboard (found on most of our S4 wooden models) To adjust the heel rests, push the centre button and slide one heel rest at a time up or down, release the button and the heel rest will lock into place. Repeat on the other side.
We recommend the strap to cover the foot just below the arch across the ball of your foot or the widest part of your foot.
For A1 and M1 WaterRower models, the floating heel rests can be adjusted manually by lifting the top lip of the heel rests to unhook and slide up or down to reposition on another hole.
Step 2. Make sure grip is correct on the handle
When holding the handle, the fingers are hooked around the grip of the handle. You do not need to actually grip the handle.
Ensure your hands are equidistant from the center of the handle. A good way is to use your thumbs to measure the same distance from the center of the handle.
Ensure your wrists are flat.
Step 3. Verify Handle Draw Height
Draw the handle to the body at a height comfortable for you. Ideally you want to draw the handle to chest or just below chest height. Your forearms should be fairly horizontal to the ground and your wrists flat.
Step 4. Make sure you sit correctly on the seat
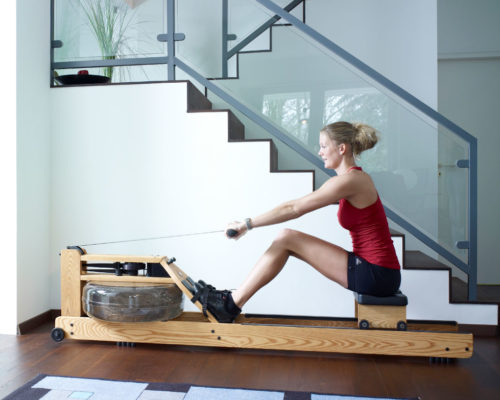
When feet are in position and you are seated, ensure you are sitting in a tall yet relaxed position. Try to feel as if you are sitting on your ‘sit’ or ischia bones and rock slightly forwards and backwards on these bones. Your body weight will move from the front to the back of the seat. Ensure you are sitting with a locked core, shoulders relaxed and head looking forwards.
S4 Monitor User Guide
Quick Start Instructions- Download Now
Owners Manual with Monitor Instructions- Download Now
Most Used Features:
-
Change Intensity Units to m/s, m/ph, watts. /500m, /2000m, cal/ph
-
Change Distance Units to meters, miles, kilometers, number of strokes
-
Set Distance or Time Workout – press workout programs button and use the up and down arrows to select the distance or time for the workout. Press ok
-
Heart Rate Zoning
-
Highlighting Stroke Ratio – press Advanced button 5x to go to Advanced Program 5 and press ok
-
Resetting monitor – hold the rest button
A1 Monitor User Guide
For A1 Home Monitor Users
A1 Monitor Instructions- Download Now
Most Used Features:
-
Change Intensity Units to m/s, mph, watts. /500m, /2000m, cal/hr, /2km
-
Change Distance Units to meters, miles, kilometers, number of strokes
-
Set Distance or Time Workout – press workout programs button and use the up and down arrows to select the distance or time for the workout. Press ok
-
Resetting monitor – hold the rest button
Frequency & Duration of Rowing - How often and for how long should I row?
When starting out, shorter sessions more often is best. Rowing 4x a week for 10 minutes is better than rowing 1x a week for 40 minutes.
For the first 6-8 weeks of rowing, aim to row at least 4x a week for 10-20 minute sessions. After 6-8 weeks, you can increase one to two sessions to 25 minutes and/or you can add another session to the week of workouts, if possible.
For the first few weeks of any rowing program you need to focus on form/technique – work on moving through each position and phase of the rowing action. Use drills such as Check Points to help you to learn the technique. It would be ideal if you could use a mirror or advice from another person to assist you with the correct body positions

Intensity - What intensity do I need to row at?
Intensity needs to be low, no more than 75% effort (of your maximum heart rate). For the first 4 weeks of rowing, aim to row to get warm – not full sweating and being out of breath. You can also use the ‘Ratings of Perceived Exertion’ chart. When starting out row at around 11 or 12 on the RPE scale.

Stroke Rate - What must my stroke rate be?
Stroke rate varies according to the individual and type of training session one is doing. Ideally strokes rates need to be around 20-24 strokes per minute for steady state sessions and around 28-32 strokes per minutes for higher intensity sessions. On water race stroke rates are between 34spm – 40spm.
Most people who are new to the sport of rowing have difficulty achieving low strokes rates while trying to obtain their desired intensity – there are many comments such as “it does not feel hard enough?” or “how can I make it harder?” Rowing is about ratio and rhythm and you need to focus on a long stroke length and a powerful drive phase (push with the legs and pull with the arms). Give yourself time to learn this, it can take a few weeks before you start to feel the intensity at low stroke rates.

Start Up Maintenance
During the first weeks of use, the wood in your WaterRower will adjust to the temperature and humidity of the environment. During this period it is strongly advised that you GENTLY tighten all the connecting bolts with the Allen key stored under the rear spacer. Please be careful not to overtighten any of these bolts.
Additionally, as the drive and recoil belts loosen up with use, it may be necessary to tighten the bungee cord. To do this, leave the handle in the full forward position and adjust the bungee/recoil belt buckle to provide a little more tension. It may be necessary to tighten to perform these two simple start up procedures once or twice over
the first month of use.
Please refer to Adjusting the Recoil video HERE
Preventative Maintenance
Periodic maintenance is required to maintain the condition of the water in the tank. We strongly ADVISE USING MUNICIPAL TAP WATER which contains treatments to keep it free from bacteria and algae, etc. The water must be refreshed periodically by adding a water purification tablet provided. The purification tablet degrades by
exposure to light: this may vary from 6 months in direct sunlight to 2 years in an artificially lit environment. Generally we suggest adding one purification tablet every six months.
If water discoloration occurs, add a purification tablet immediately. If the water does not clear, we recommend emptying the tank, flushing it out with clean water, refilling and adding a purification tablet.
NEVER USE POOL CHLORINE OR CHLORINE BLEACH in the tank as this will irreparably damage the polycarbonate tank.
Maintaining and Cleaning
To maintain the appearance and integrity of your WaterRower it is necessary to keep the machine clean. It is particularly important to ensure that there is no dust build up in the clutch and belt mechanism between the top and bottom decks. Dust can be removed by using a cloth or vacuum cleaner.
The surface of the rails must be kept clean to prevent dust and dirt from deteriorating the seat wheels; the rails can be cleaned by wiping with a damp cloth. The surface of the tank can be cleaned, however, please ensure you read the instructions for any cleaning fluids prior to use.
DO NOT USE METHYLATED SPIRITS, CHLORATES, BLEACH OR AMMONIA BASED FLUIDS WHEN CLEANING ANY PART OF YOUR WATERROWER
Maintaining The Wood
The natural wood WaterRowers are finished with Danish oil which gives a deep penetrating finish to the hardwood frame. Other than occasional dusting or polishing, the wood requires no maintenance. If you are the owner of an Oxbridge WaterRower, you will notice that Cherry wood is photosensitive and will develop a wonderful dark
patina color over time. The finish of the wood is not water resistant; we do not recommend storing the WaterRower outside.
To shop for Danish Oil please visit our Accessories Shop (For U.S. and Canadian Customers)
All other countries please refer to this page for their nearest WaterRower office- https://www.waterrower.com/us/contact-us
For other maintenance tips, guides and troubleshooting please visit our service website waterrowerservice.com

